
Learning to Climb Outdoors: A Beginner’s Sport Climbing Guide
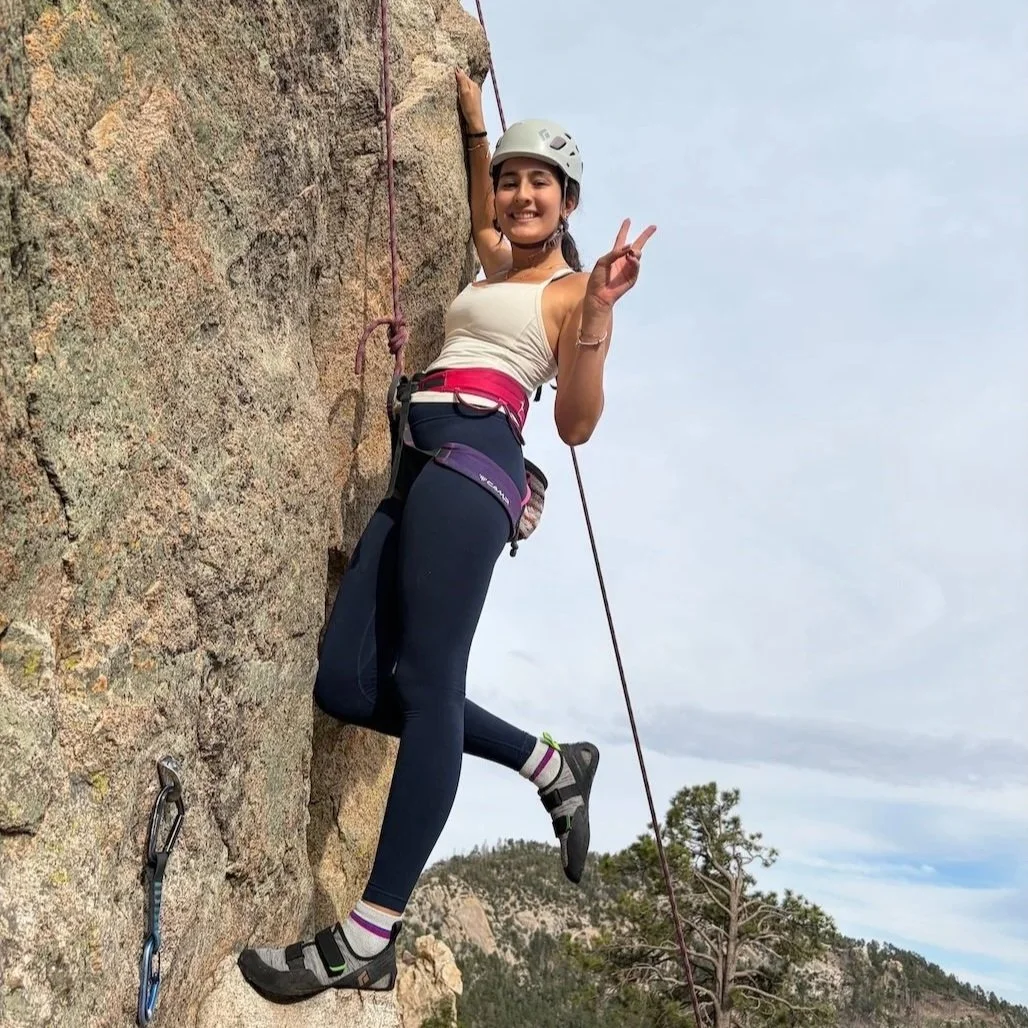
Moving from an indoor climbing gym to real rock is an exciting step, but outdoor climbing introduces new skills, hazards, and responsibilities. Outdoor climbing introduces changing weather, loose rock, route finding, rope management, anchor-building, and local climbing ethics. So, we need some basic preparation beyond climbing gym experience. In this guide, you’ll learn what changes when you climb outdoors, which skills and gear you need, and how to make the transition safely. We’ll focus mostly on sport climbing, since this is a common progression for many gym-to-crag climbers.
Disclaimer: This article is an overview, not a substitute for in-person climbing instruction. Anchor building, route cleaning, lead climbing and belaying, and fall practice should be learned and practiced with a qualified instructor or experienced, competent mentor.
Is Gym Climbing Enough Preparation for Outdoor Climbing?
Gym climbing provides a solid foundation for outdoor climbing, but it doesn’t prepare you for every challenge you will face on real rock. You likely have some movement skills, strength, endurance, and some technical knowledge like how to belay and tie-in. This is the foundation on which you will build your outdoor climbing. Now, you’ll need to learn technical skills such as selecting suitable routes, building anchors, communicating over longer distances, clipping correctly, evaluating fixed gear, and lowering or cleaning routes.
Outdoor Climbing Etiquette and Access
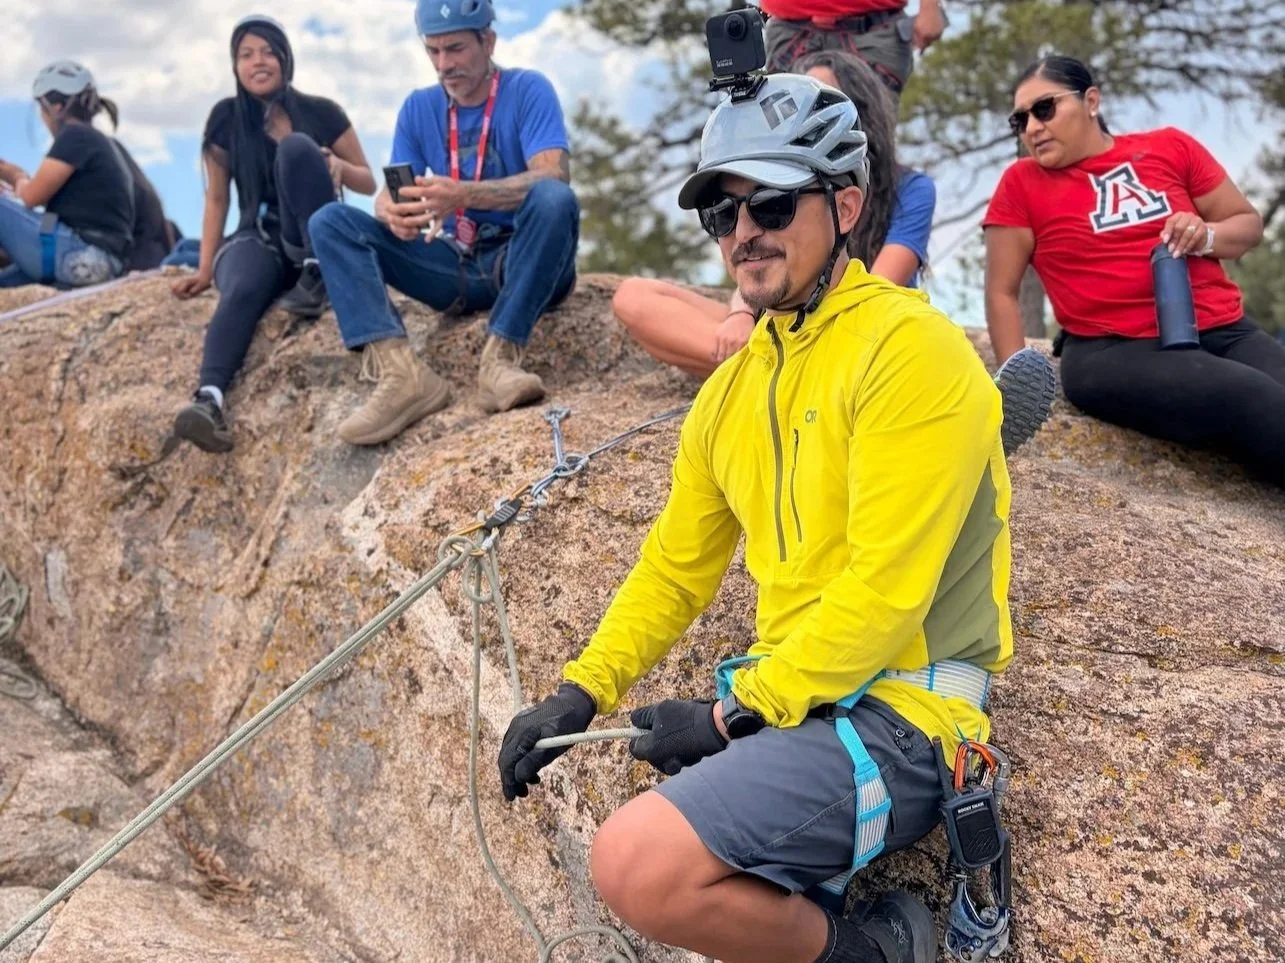
Climbing etiquette is just as important as technical skills. Outdoor crags are natural habitats and shared, limited spaces. Countless hours are spent in stewardship of these lands by Forest and Park service employees, Local Climbing Organizations (LCOs), volunteers, and route developers. As a newer outdoor climber, you can go a long way in being a considerate member of the climbing community by observing a few basic rules of etiquette:
Leave No Trace
Outdoor crags are natural habitats, not gyms. Keep them pristine:
Pack out all trash: Even biodegradable items like banana peels and other food scraps must go with you. Microtrash like climbing tape must be packed out too.
Manage bodily waste: Research local waste-disposal regulations before your trip. Where catholes are permitted, follow Leave No Trace guidance; in sensitive or heavily used areas, pack out human waste in a portable waste bag (WAG bag).
Respect seasonal closures: Land managers frequently close certain cliffs to protect nesting raptors (like falcons). Check local guidebooks or land management websites before you go. Seasonal closures are also typically listed on Mountain Project area pages.
Be a Good Neighbor
Unlike an indoor gym, crags are shared, limited spaces:
Keep the volume down: Leave the Bluetooth speaker at home. Loud music and excessive yelling destroy the natural experience and can block crucial voice commands (like "take" or "rock!") between climbers and belayers.
Control pets and children: Keep your dog on a leash and prevent them from running on trails, jumping on other climbers, or chewing on expensive climbing ropes.
Do not hog routes: If another group wants to try the route you are on, rotate turns. Do not monopolize a popular warm-up line for a multi-hour "project".
Protect the Route
Real rock is a non-renewable resource that can be permanently damaged:
Never climb on wet sandstone: Sandstone becomes exceptionally fragile when wet and climbing it leaves permanent, gouged-out holds. Follow local guidance about how long the rock needs to dry, since drying time varies with temperature, shade, precipitation, and the type of sandstone.
Brush your tick marks: If you tick a hold, clean it off afterward. Do not leave large white "tick marks" (chalk lines) on the wall.
Avoid top-roping directly off fixed anchors: If you are top-roping, use your own locking carabiners or quickdraws rather than letting your rope run directly through the crag's permanent fixed gear (like steel lower-off rings). This prevents the permanent metal from wearing down.
Leading a Sport Climb
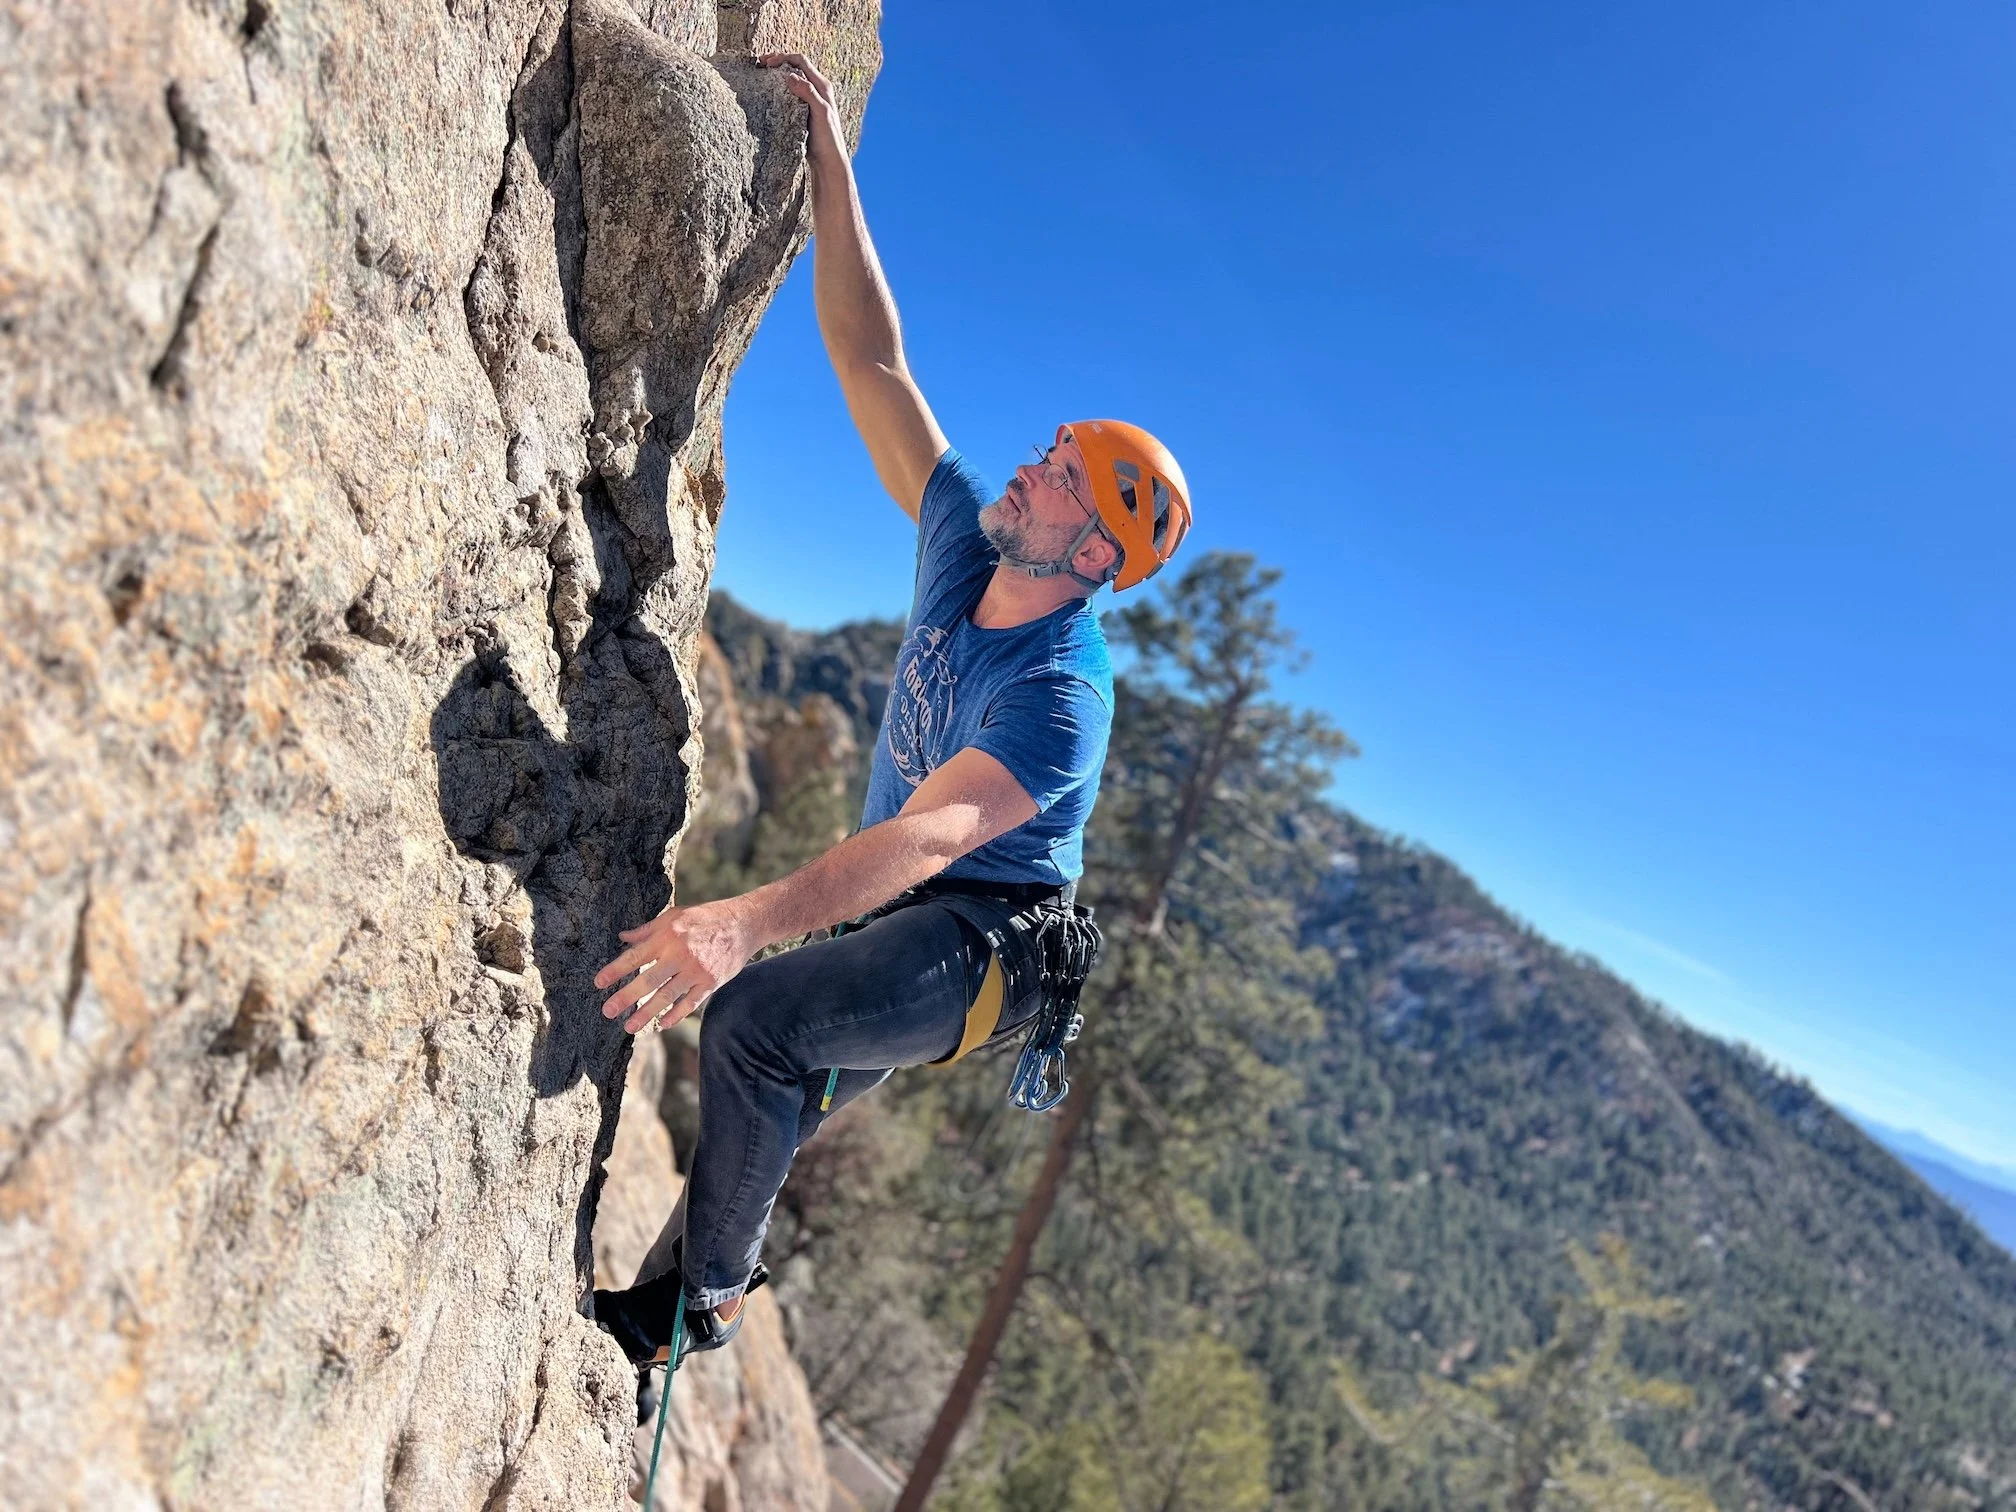
For gym climbers interested in outdoor roped climbing, sport climbing is often the most direct transition. This section assumes that you already know foundational skills such as tying in, performing a partner check, and using your belay device correctly. Many climbers learn to lead indoors before applying those skills outside, but outdoor climbing introduces additional considerations such as route-finding, uneven terrain, variable bolt placement, and unfamiliar anchors.
What is Leading?
In lead climbing, the climber starts with the rope tied directly to their harness while the belayer manages the rope from below. As the climber moves upward, they attach the rope to protection along the route—typically fixed bolts on a sport climb. This differs from top-rope climbing, where the rope is already running through an anchor above the climber before the climb begins.
Because the lead climber must climb above the most recently clipped piece of protection, lead falls can be longer and scarier than top-rope falls. A climber who is three feet above the last bolt may fall roughly six feet before the rope begins to catch them, plus additional distance from rope stretch, slack in the system, and the movement of the belayer. The exact fall distance depends on several factors, including the climber’s position, the spacing between protection points, the amount of rope in the system, and the terrain.
Gear List
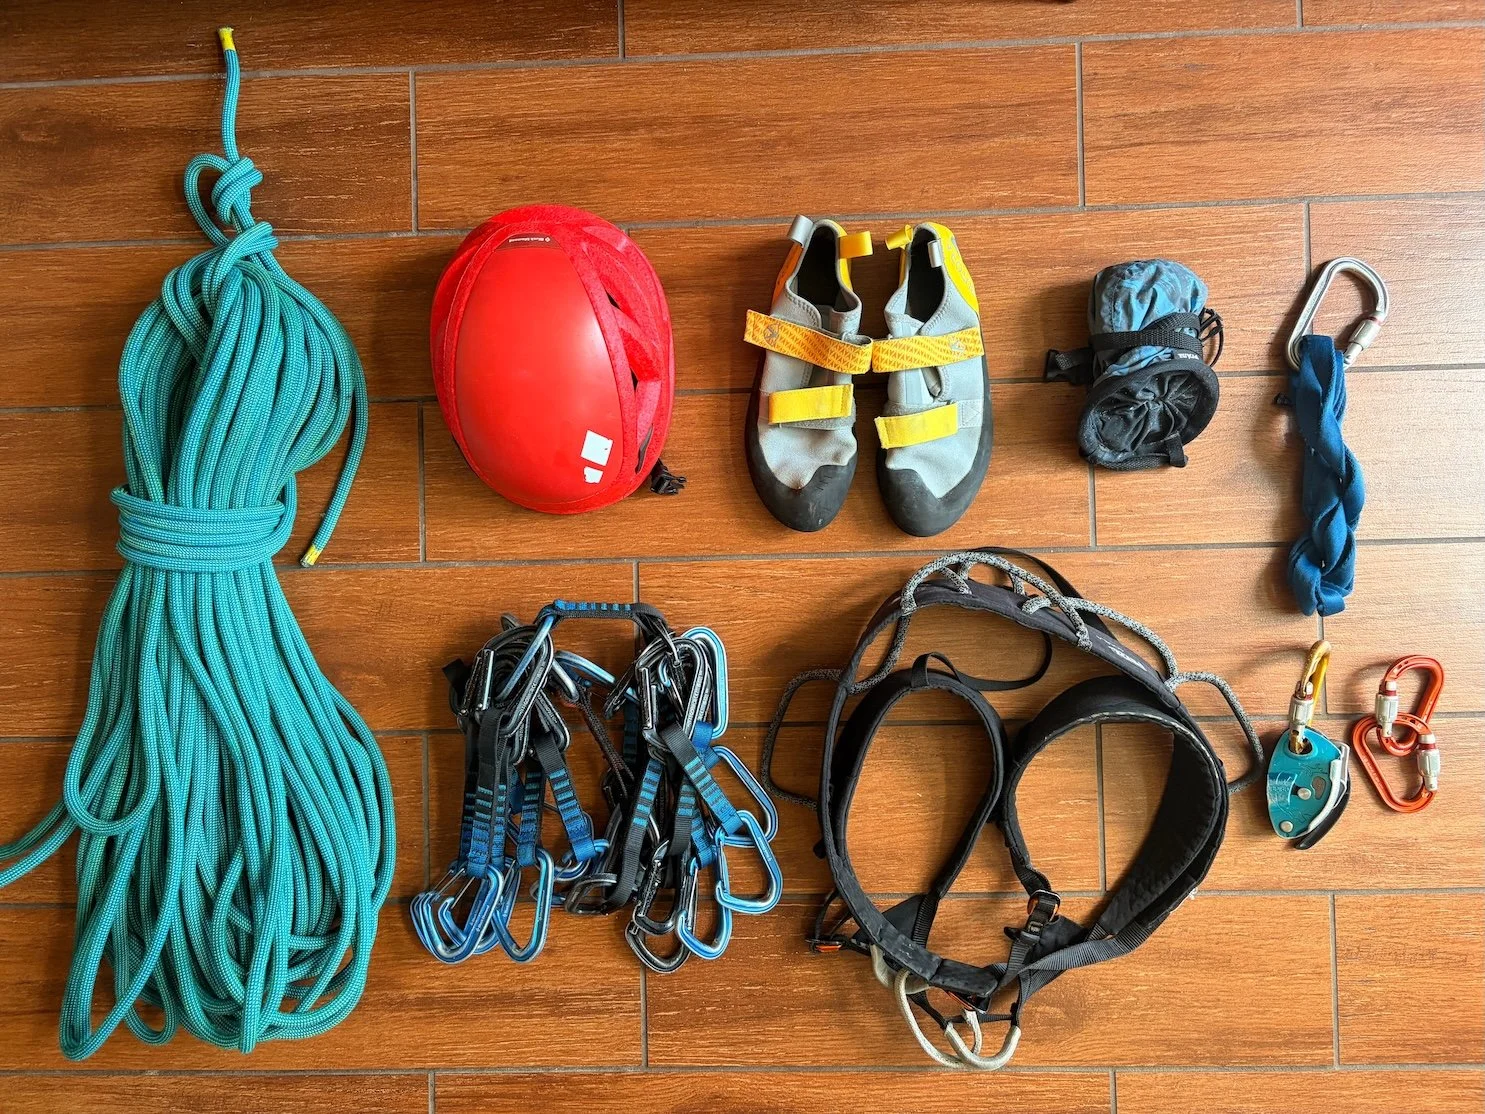
Personal gear and a typical sport climbing rack.
Climbing harness: A properly fitted harness.
Climbing shoes: Shoes appropriate for the style of climbing. As a guide, I often recommend less aggressive shoes when first climbing outdoors. Comfort is key.
Climbing helmet: Protects against falling rock, dropped equipment, and impacts during a fall. A helmet is especially important outdoors, where loose rock and dropped equipment present hazards that do not normally exist in a gym.
Dynamic climbing rope: Confirm that the rope is long enough for the route and descent. Always tie a stopper knot in the belayer’s end.
Quickdraws: Bring enough for every bolt on the route, plus additional draws for the anchor when needed.
Belay device: Use a device designed for lead belaying and compatible with the rope’s diameter. We recommend a GriGri.
Locking carabiners: Used for belaying, anchor systems, and certain anchor transitions. Bring enough for your planned systems, plus a couple of spares.
Personal anchor system or slings: To use during anchor transitions.
Chalk bag and chalk: This one is optional.
Clipping Quickdraws
Clipping quickdraws is a fundamental sport-climbing skill. Your belayer should have you on belay before you leave the ground, but the rope cannot arrest a fall until it has been clipped through the first quickdraw. Before that first clip, the belayer may need to spot the climber and help manage the landing zone, similar to outdoor bouldering. Practice clipping at ground level before progressing to easy routes.
When to Clip
To clip a quickdraw, you must find a “stance,” a body position that is secure enough that you can remove one hand from the rock and use it to clip. Ideally the bolt is at torso-level, although in practice this isn’t always feasible.
If you wait until the bolt is at your feet, it is awkward to reach, and you are subjecting yourself to the possibility of a longer fall. If you “high clip,” or reach way above your head to make the clip, you are pulling a large bite of slack into the rope system, and again at risk of a long fall.
Bolt End vs Rope End
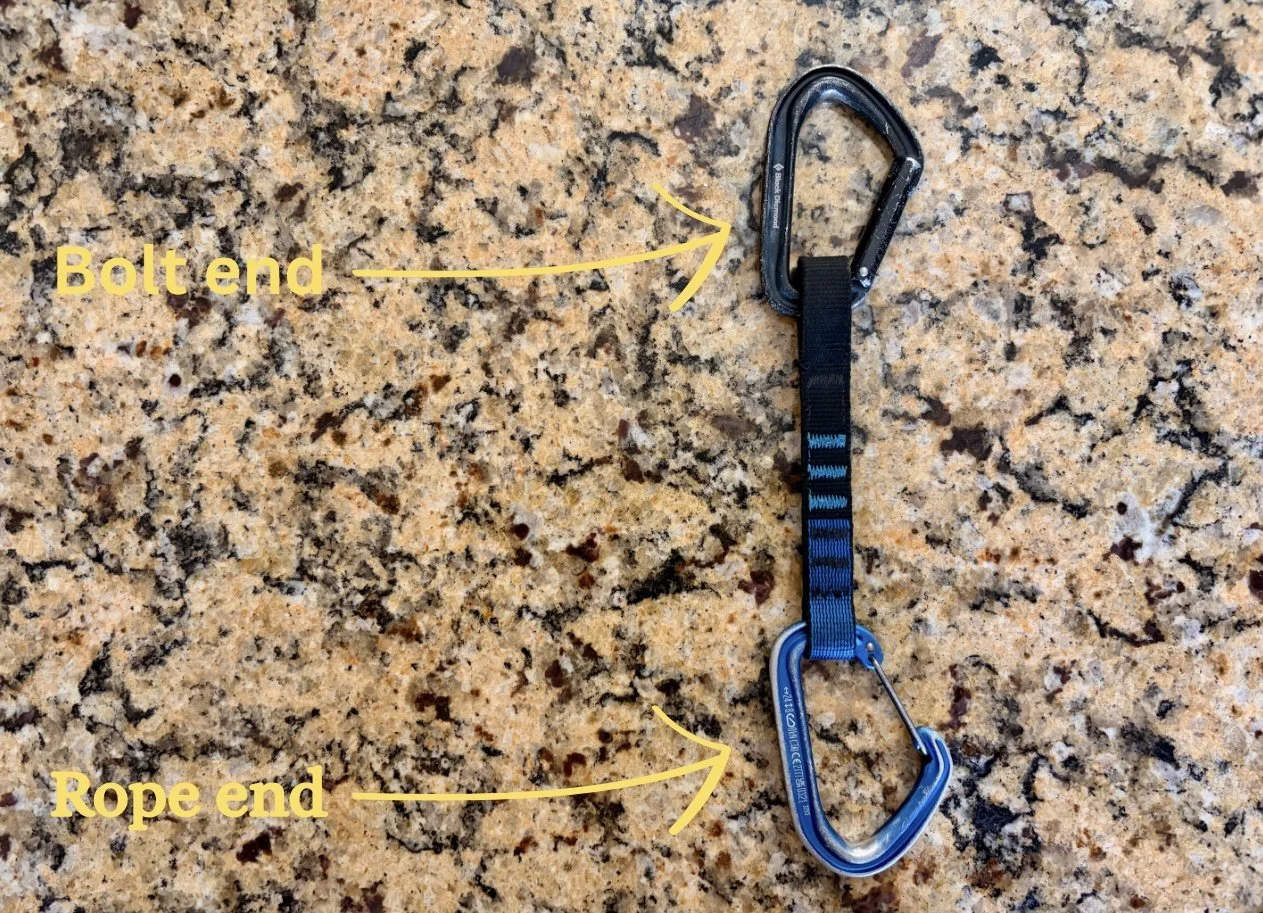
Most quickdraws have two different carabiners: one designed for the bolt and one designed for the rope. The bolt-end carabiner usually has a straight gate and clips into the bolt hanger. The rope-end carabiner often has a wiregate or bent gate, making it easier to clip the rope while climbing.
Always use each carabiner for its intended purpose. Repeated contact with metal bolt hangers can create small burrs or sharp edges on the bolt-end carabiner. If you later use it for the rope, those rough edges could damage the rope’s sheath.
The rope-end carabiner is also commonly held in position by a rubber keeper on the quickdraw sling. This keeps it correctly oriented, and makes clipping more consistent. The bolt-end carabiner should remain free to move so the quickdraw can align naturally with the direction of pull.
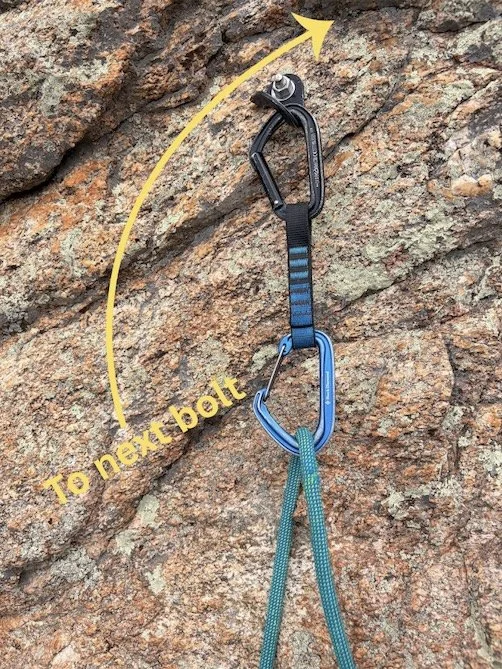
Orient Quickdraws for the Direction of Travel
Consider the direction the route continues above the bolt. The gate of the rope-end carabiner should face away from the climber’s anticipated direction of movement so the rope runs along the stronger spine of the carabiner rather than across the gate.
Incorrect orientation can increase the chance of the rope pressing against the gate during a fall or as the climber moves past the bolt. In some situations, this may cause the carabiner to open and the rope to unclip.
Check How the Quickdraw Rests Against the Rock
Be aware of how the rope-end carabiner is positioned against the rock. Avoid placements where the carabiner hangs directly over an edge, corner, or lip. These types of placements can cause the carabiner to be damaged during the high forces generated in a lead fall.
It can be helpful to carry quickdraws in more than one length, or alpine draws. A longer draw may allow the lower carabiner to hang below an edge, while a shorter draw may keep it above a bulge or irregular feature.
Also check whether the gate could strike or press against the rock during a fall. Contact with a protruding feature can momentarily open the gate. This significantly reduces the carabiner’s strength, and can cause the rope to unclip.
Clipping the Rope into the Quickdraw
You’ve hung the draw on the bolt hanger. The next step is to clip your rope through the rope-end carabiner to complete this piece of protection. There are two main ways to clip in the rope, which we’ll refer to as the Pinch Clip Technique and the Snap Clip Technique. Which technique you use depends on which direction the quickdraw is facing, and which hand you grab the rope with.
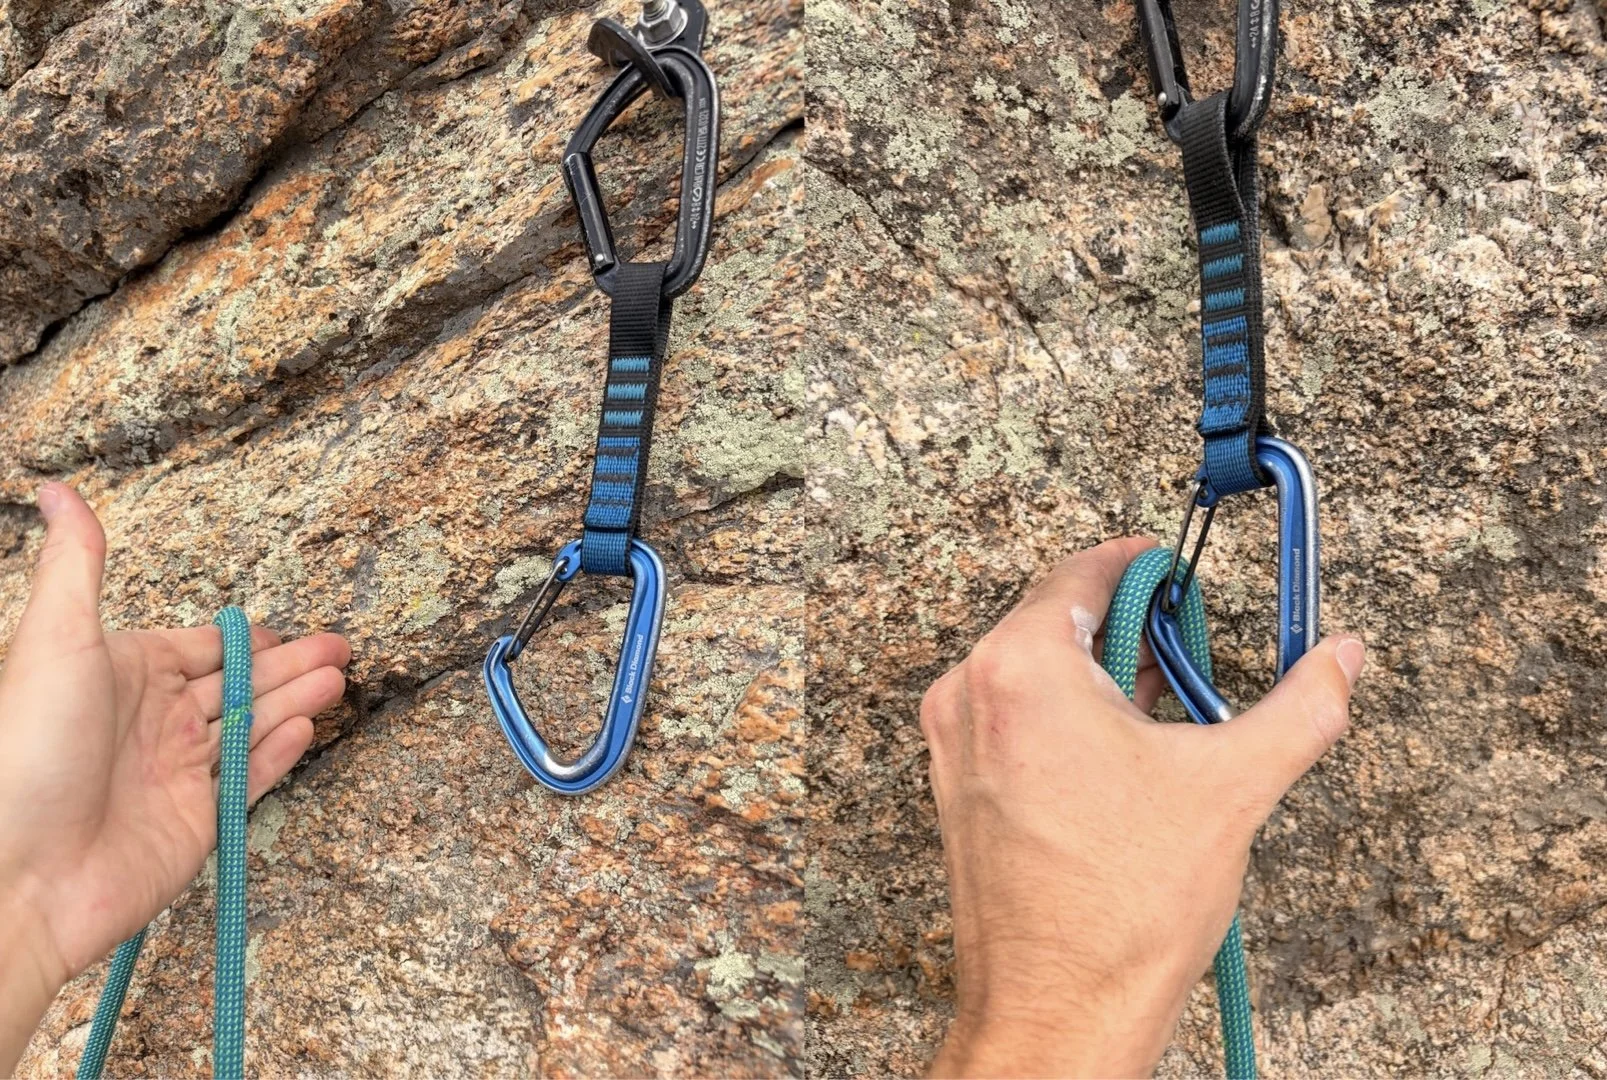
Pinch Clip Technique
Pinch Clip Technique
Grab the rope with an open palm, and slide your hand up the rope as you pull it up towards the quickdraw.
Twist your hand to let the rope run over your index finger.
Use your thumb on the spine of the rope-end carabiner to stabilize the quickdraw
Pinch the rope through the gate of the carabiner to finish the clip.
Note: use this technique when the gate of the rope-end carabiner is facing towards the hand you grab the rope with.
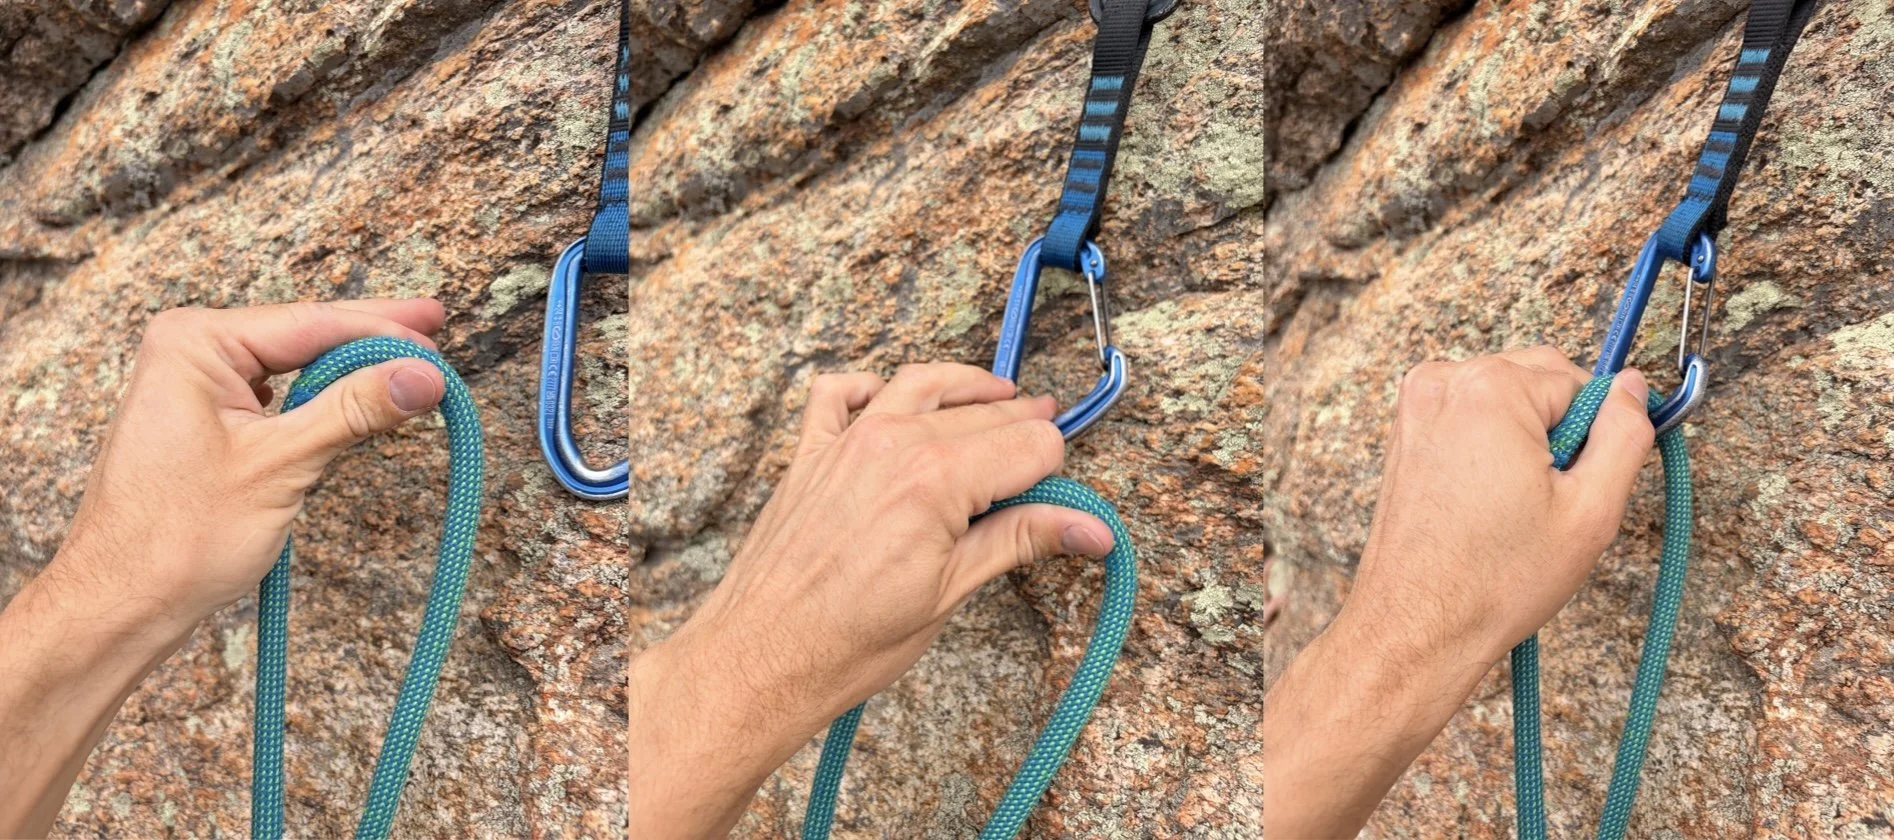
Snap Clip Technique
Snap Clip Technique
Grab the rope with an open palm, and slide your hand up the rope as you pull it up towards the quickdraw.
Grab the rope between your thumb and forefinger.
Take your middle finger and hook it into the carabiner to stabilize it.
Push the rope through the gate with your thumb and forefinger.
Note: use this technique when the gate of the rope-end carabiner is facing away from the hand you grab the rope with.
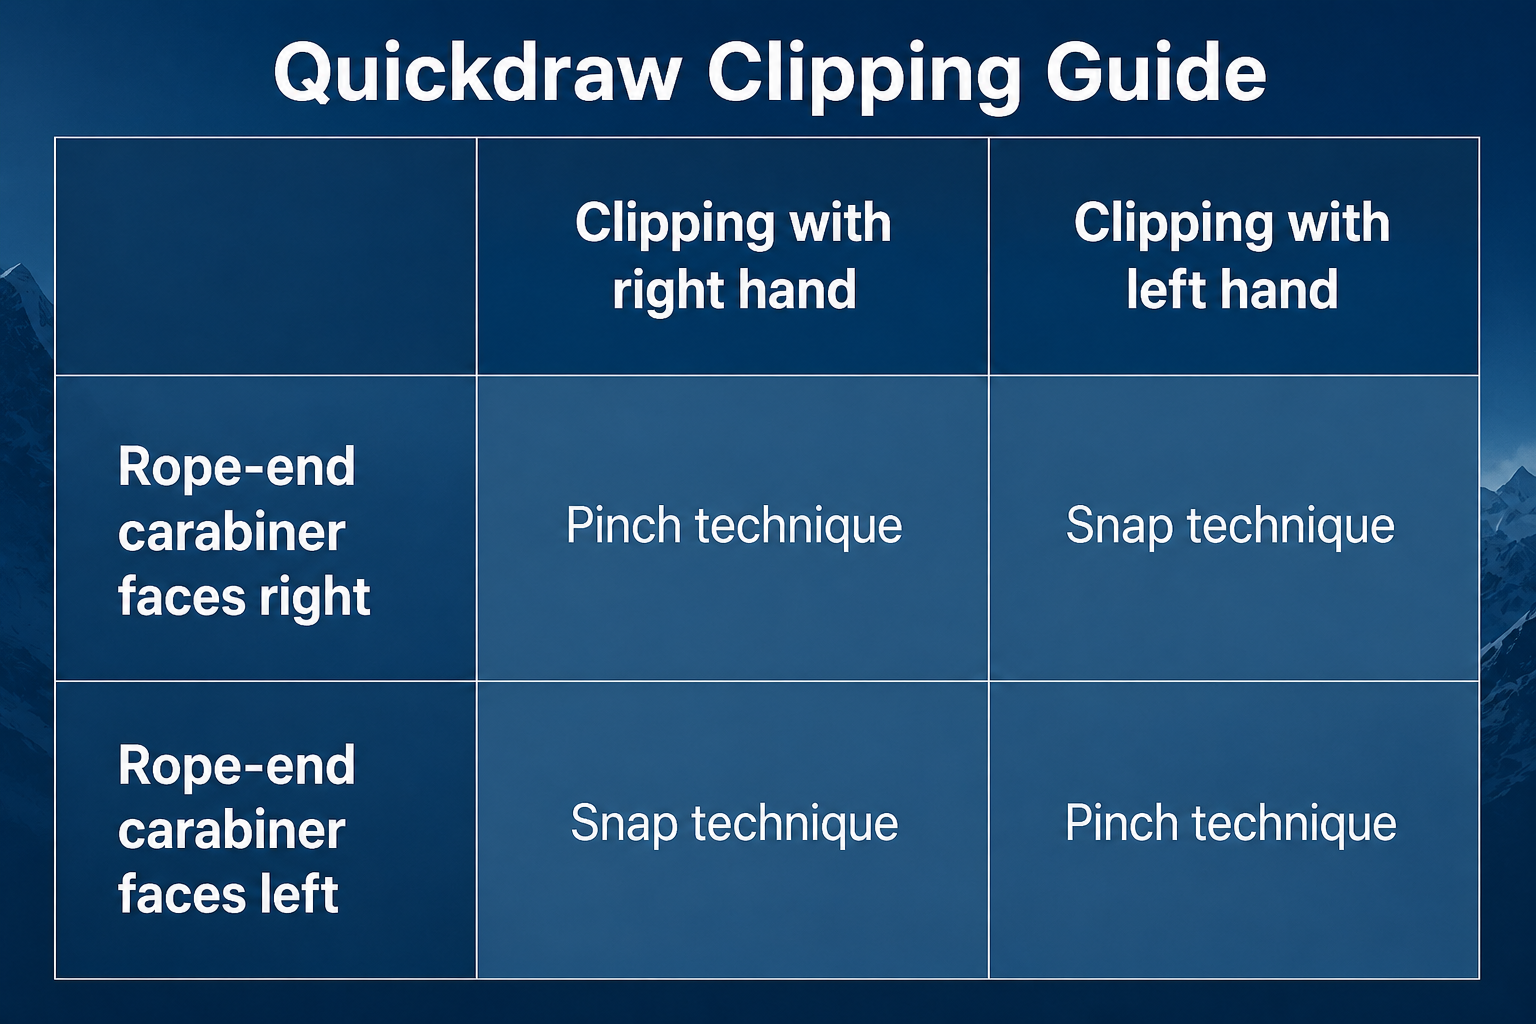
Mistakes to Avoid
Back clipping
This common mistake occurs when the rope is clipped through the quickdraw in the wrong direction. In a correct clip, the rope runs from the belayer, through the back of the carabiner and out the “front window” of the carabiner to the climber. If the strand leading to the climber comes out of the back of the carabiner, the quickdraw is back clipped.
A simple check: The climber’s end of the rope should come out of the “front window” of the carabiner, not around the back between the carabiner and the rock.
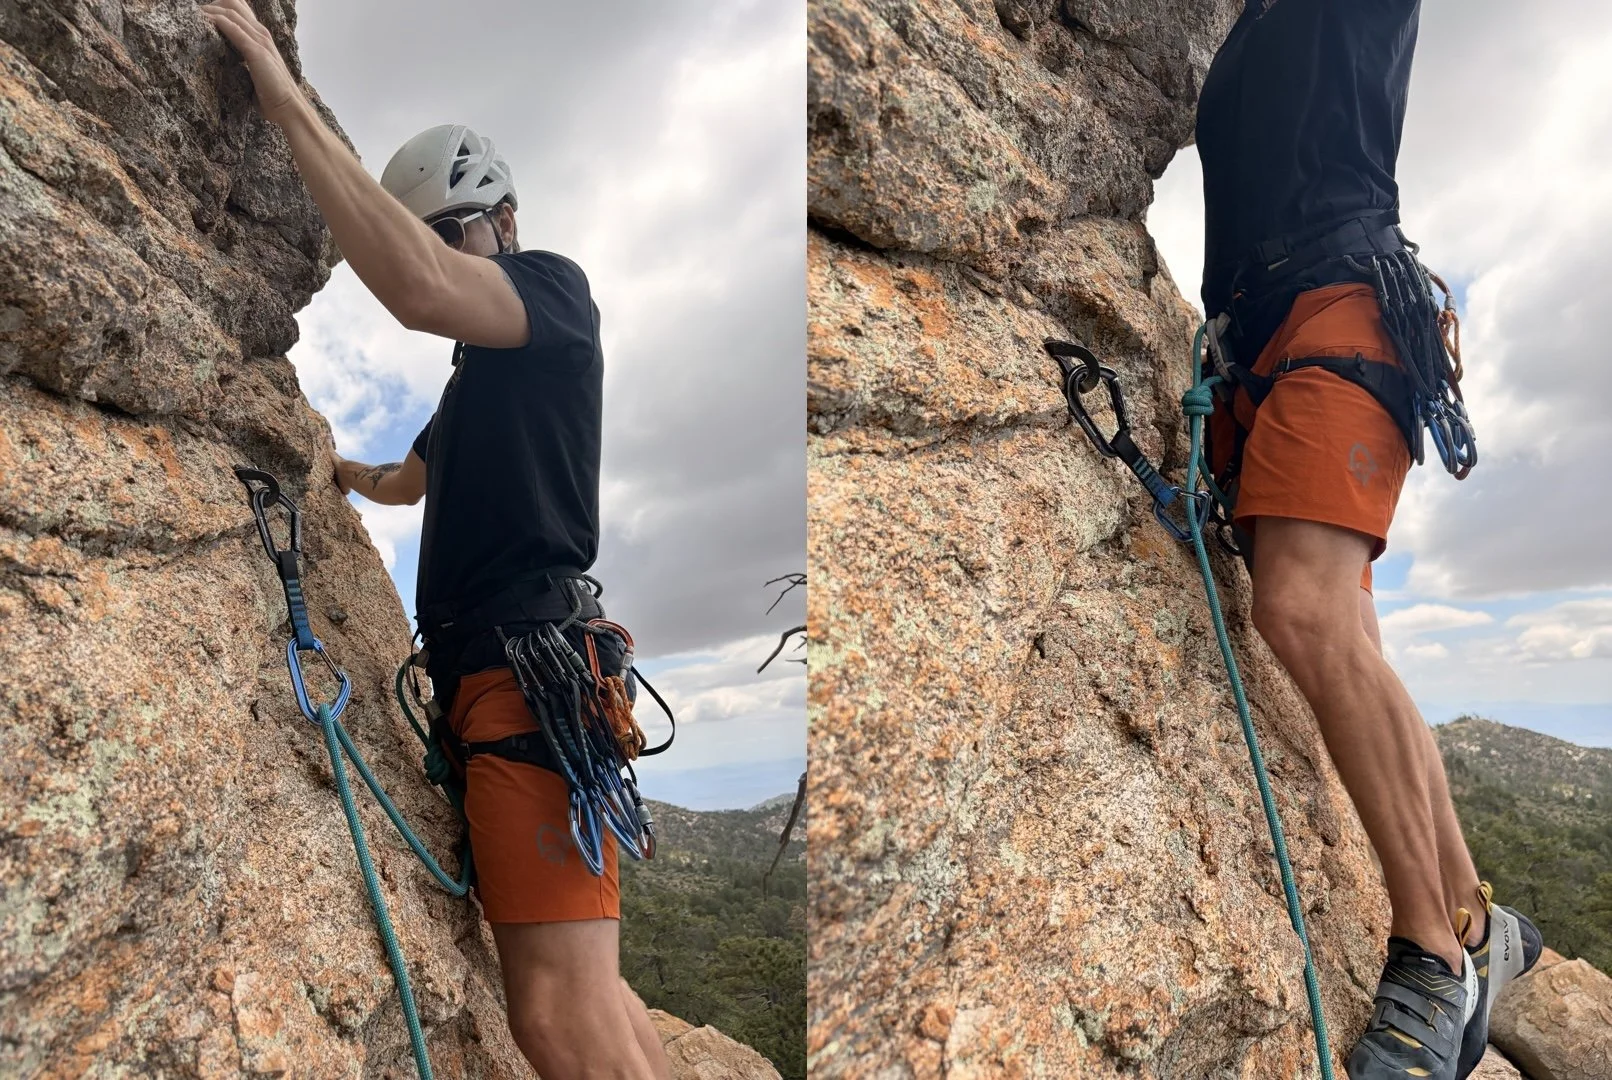
A back clipped quickdraw. The rope runs from the climber to the back of the rope-side carabiner.
Why is this dangerous? A back clipped quickdraw can run across the carabiner’s gate. When falling in certain situations, the rope may push against the gate and unclip itself from the quickdraw.
How to avoid back clipping? Practice, practice, practice. Back-clipping is a common learning-stage mistake. The goal is to develop consistent clipping habits while also learning to recognize and correct an improper clip promptly.
Back clips often happen when a climber is panicked, scared, or hurrying. Try to pause long enough to see the rope’s path before clipping. Always try to clip from a balanced stance, rather than rushing while fully extended or off balance.
What to do if you back clip a quickdraw? Remain calm and correct the back clip before climbing farther. From a stable position, unclip the rope and reclip it in the correct direction. Another option is to clip a second quickdraw to the bolt and clip the rope correctly before removing the original draw. This follows the principle of adding the new protection before removing the old protection.
If you cannot correct the clip from a secure position, do not continue climbing above it. Communicate with your belayer and retreat from the route.
Z-clipping
Z-clipping occurs when the climber clips the next quickdraw using rope pulled from below the previous quickdraw rather than the strand running directly from the harness. It is most common when bolts are close together and the climber reaches too far down the rope. The resulting rope path travels from the belayer through the upper quickdraw, back down through the lower quickdraw, and then upward to the climber, forming a rough “Z” shape.
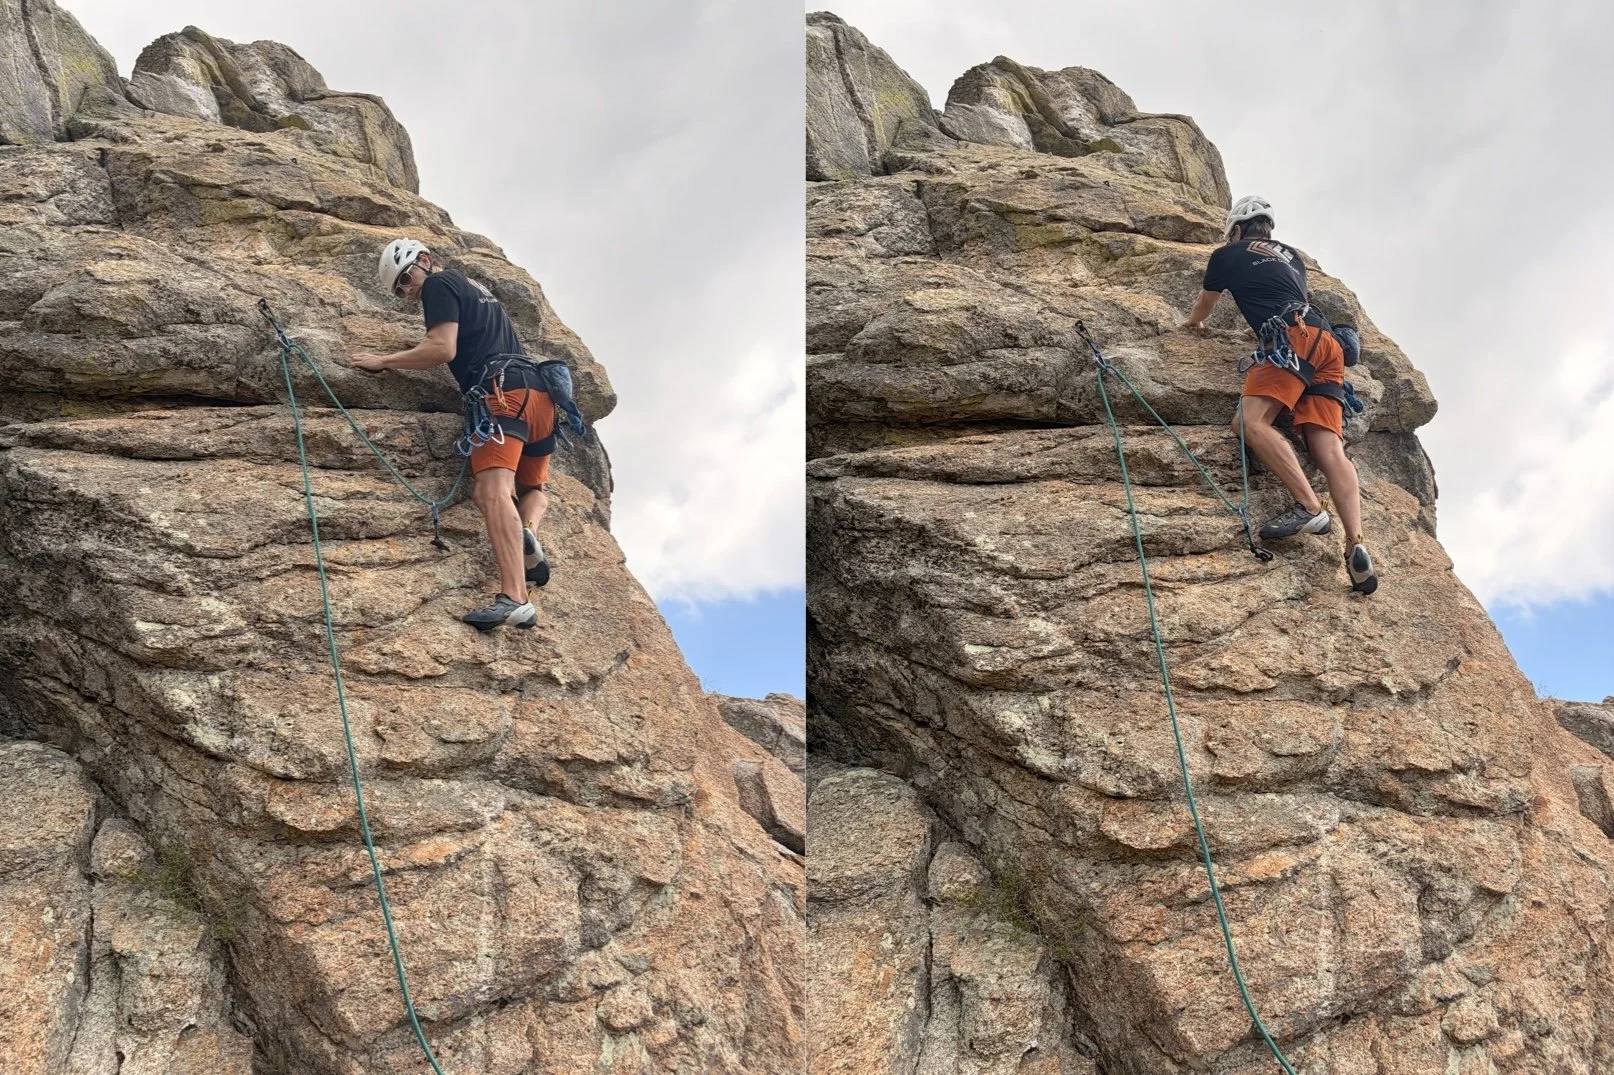
A Z-clip.
Why is this dangerous? A Z-clip causes severe rope drag and prevents the newest quickdraw from functioning as the climber’s highest point of protection. Continuing upward can therefore expose the climber to a longer fall.
How to avoid Z-clipping? A simple way to avoid Z-clipping is to begin each clip by touching your tie-in knot, then slide your hand along the rope toward the next quickdraw. This ensures that you are clipping the strand connected directly to your harness.
What to do if you’ve Z-clipped? You will know almost immediately, due to the horrendous rope drag you feel impeding your upward movement.
Downclimb to a secure stance where you can comfortably reach the lower of the two quickdraws involved. Unclip the rope from that lower quickdraw, then reclip it using the correct strand of rope. This removes the Z-shaped rope path and allows both quickdraws to function normally again.
Rope behind the leg
While lead climbing, never allow the rope to run behind your leg. If you fall with a leg trapped between the rope and the wall, the rope can catch the leg as it tightens and flip you upside down.
Regularly check the rope’s path as you climb, especially after stepping sideways, crossing your feet, or moving around the rope. The strand running from your harness to the last quickdraw should remain clear of your legs and pass directly toward the protection below. If the rope moves behind a leg, pause from a secure position and carefully step back over it before continuing.
Flipping upside-down happens to even very experienced climbers, often when distracted by a hard redpoint attempt. The number one thing you can do to mitigate injury risk during an inverted fall is to wear a helmet.
Setting Up A Top-rope
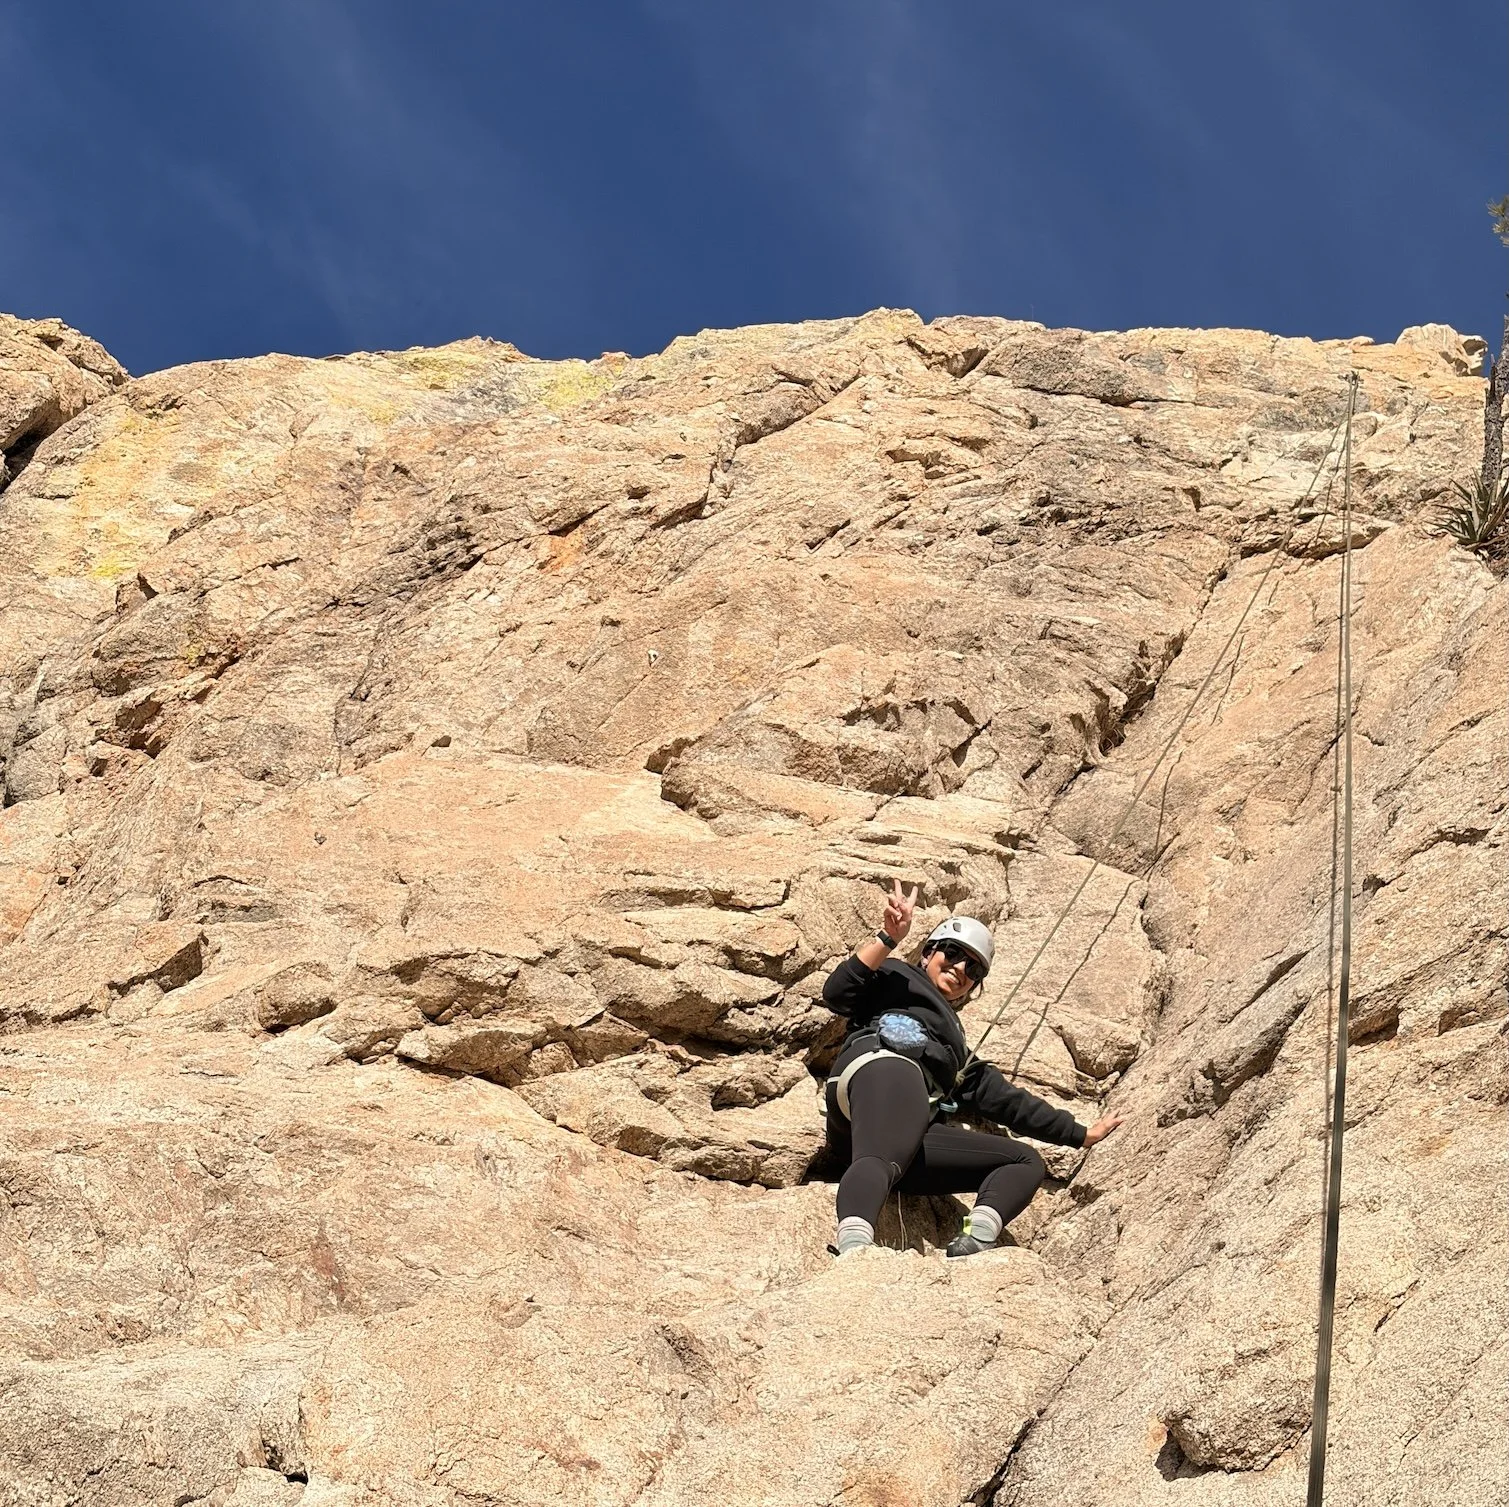
A top-rope climber.
If other members of your party want to climb the route after you have led it, you can establish a top-rope anchor using your own equipment. Running repeated top-rope laps through your own carabiners or quickdraws reduces unnecessary wear on the permanent lowering hardware.
For a typical sport route with two anchor bolts, two quickdraws are often the simplest option. Clip one quickdraw to each independent anchor point and run the rope through both rope-end carabiners. The draws should hang freely, share the load reasonably evenly, and be positioned so neither carabiner is pressed or levered against the rock. They should also be opposed—the gates should face opposite directions, one left and one right.
For additional security, use one or two “locker draws,” quickdraws made with locking carabiners.
Although the quickdraw anchor is most common, it is not appropriate for every anchor configuration. If the anchor bolts are significantly offset, or the rope or quickdraws would run over an edge, an anchor using slings or cord may be more suitable. Popular options are the Quad anchor and Cordelette anchor.
Anchor Cleaning
Anchor cleaning is the process of retrieving your personal equipment from the top of a route and transferring onto the fixed gear for lowering or rappelling. Depending on the anchor, this may involve clipping the rope into fixed hooks or carabiners, or threading it through closed rings or quicklinks. Because a mistake during this transition can disconnect the climber from the rope or anchor, cleaning is a high-consequence skill that has resulted in serious accidents.
Mussy Hooks
Mussy hooks have become common at many sport-climbing areas because they are durable, easy to inspect, and allow the climber to clip the rope into the lowering hardware without untying. This is the process for cleaning a route with a mussy hook anchor—
Connect yourself to the anchor. Connect your personal anchor system (PAS) while keeping the rope clipped through your anchor quickdraws.
Ask the belayer for slack. Request only the amount needed to clip the lowering system.
Clip the rope into both Mussy hooks. Clip the climber’s strand directly into both hooks. Confirm that the rope is fully seated and both gates are closed.
Ask the belayer to take. Wait while the belayer removes the slack and confirms that they have you.
Load and test the new system. Gradually transfer your weight onto the rope running through the Mussy hooks while remaining connected to the anchor with your previous system.
Remove your anchor equipment. Once the new lowering system is loaded and verified, remove the rope from your anchor quickdraws and retrieve the quickdraws.
Disconnect your personal tether. Remove your PAS or tether only after confirming that your full weight is supported by the rope and belayer.
Ask to be lowered. Perform one final visual check and lower.
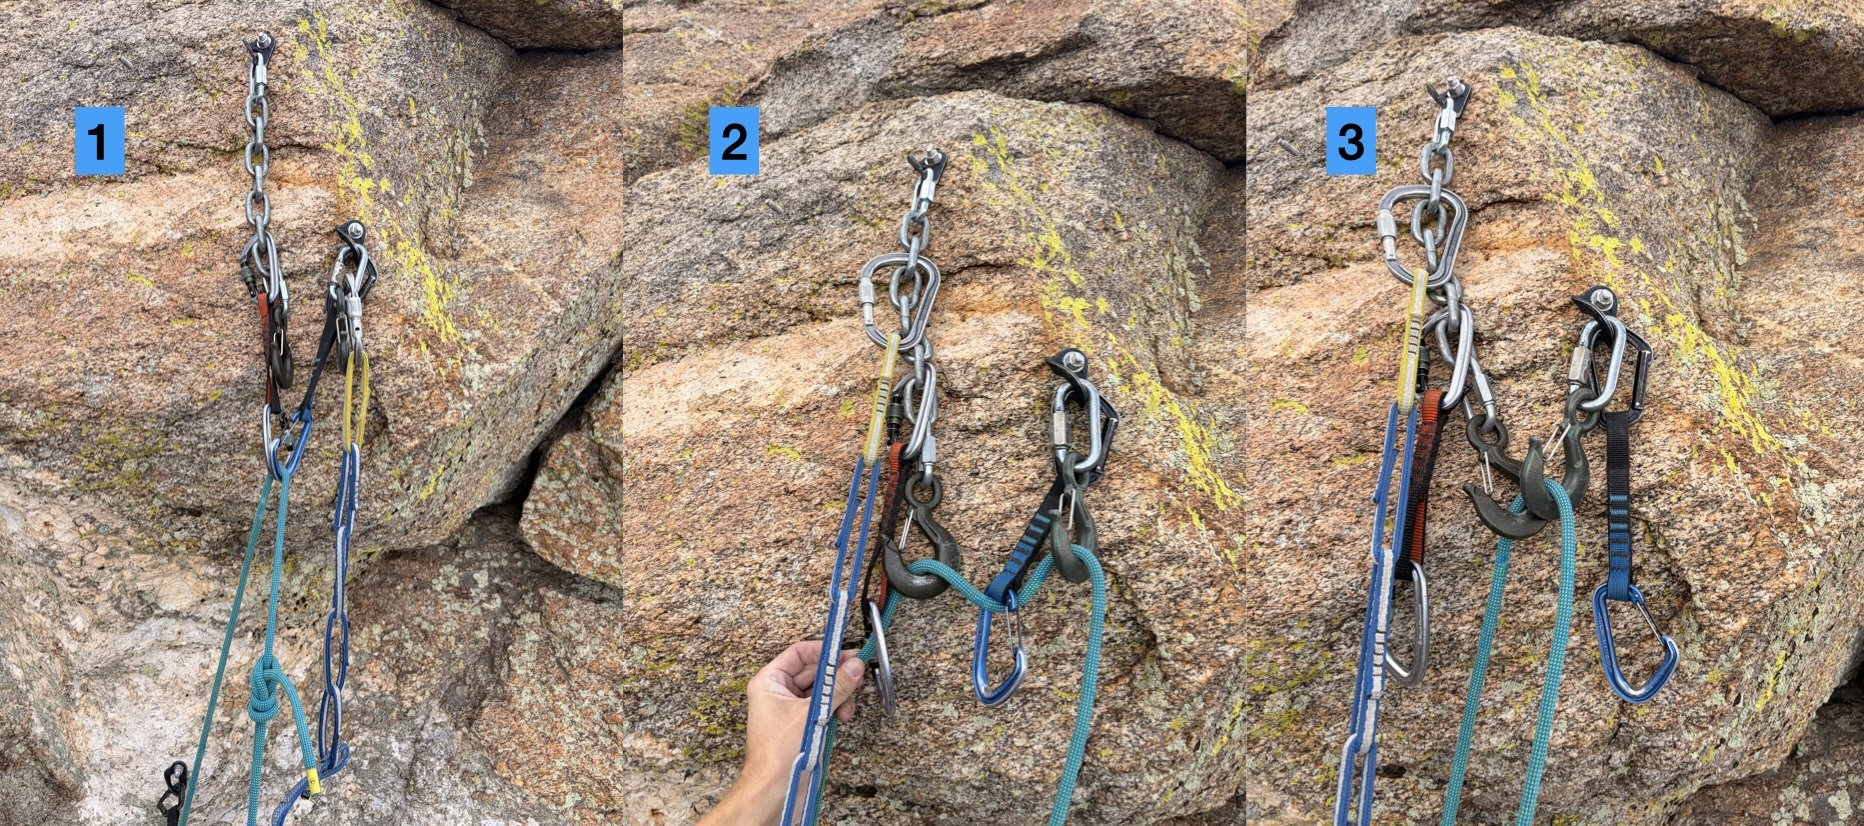
Cleaning a mussy hook anchor.
As always, follow the principle “load before you unload.” Fully weight and confirm the new safety system before disconnecting from the old one. In this case, that means transferring your weight onto the Mussy hooks and verifying that the belayer has you before removing your PAS or anchor quickdraws.
Chains/Rap Rings/Other Closed Anchor Points
Cleaning an anchor with closed rings or quicklinks involves additional steps because the rope cannot simply be clipped into the lowering hardware. Rather than attempting to teach that complete procedure in writing, we recommend this video demonstration of sport-anchor cleaning techniques, approved by the American Mountain Guide Association— How to Clean Top Rope Anchors.
As with all new skills, practice on the ground before taking these techniques into the mountains.
Mental Training for Lead Climbing
Learning to lead is not only about clipping correctly and managing the rope. It also requires becoming comfortable with uncertainty, exposure, and the possibility of falling. Fear is a normal and useful response, but it can interfere with movement and decision-making when it becomes overwhelming.
Techniques like mock leading and controlled fall practice allow climbers to develop confidence gradually while practicing lead-climbing skills. The goal is not to eliminate fear or force yourself into large falls, but to build familiarity with the process and learn how to remain composed while climbing above your protection.
Mock Leading
Mock leading allows a climber to practice lead-climbing skills while still protected by a top-rope system. The climber ties into a second rope and clips quickdraws as though they were leading, while the top-rope belayer provides the actual protection. This creates an opportunity to practice clipping, rope management, communication, and recognizing mistakes such as back-clipping or Z-clipping without taking a true lead fall.
Mock leading is especially useful for climbers transitioning from top-rope climbing to sport leading because it adds the mental and technical demands of leading in a more controlled setting.
Lead Fall Practice
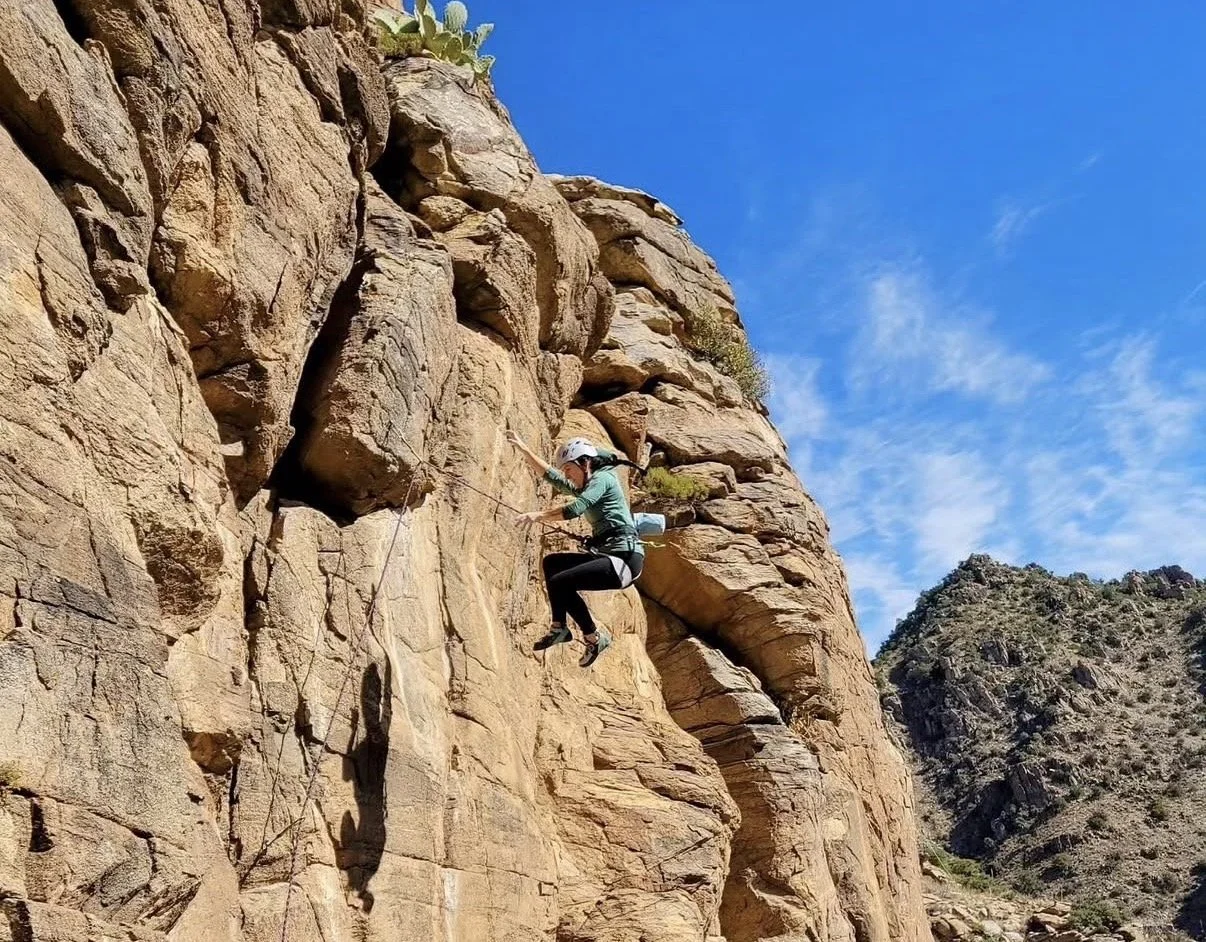
A climber mid-lead fall.
Lead fall practice helps climbers become familiar with the experience of falling and being caught by the rope. It can reduce anxiety, build trust between the climber and belayer, and help both partners practice the communication, body position, and belaying techniques involved in a controlled catch.
Begin with very small falls on an appropriate route with clean, unobstructed terrain and plenty of distance from the ground, ledges, and other hazards. As comfort and competence improve, the climber may gradually increase the distance above the bolt before letting go. Begin by falling with a bolt at your head, then chest, waist, knees, etc.
Fall practice should be done on vertical or slightly overhanging routes to ensure a clean fall.
Learn to Climb Outdoors with a Guide
Articles and videos can help you understand outdoor climbing systems, but they cannot provide real-time feedback or evaluate whether you are performing a technique correctly. Altitude Mountain Guides offers private outdoor climbing instruction in Tucson for climbers making the transition from the gym to real rock. Depending on your experience and goals, a guided day can cover outdoor movement, lead climbing, lead belaying, clipping, anchor systems, route cleaning, and risk management.
Explore our Tucson rock-climbing trips and private instruction.
FAQs
How many quickdraws should I bring for sport climbing?
Bring at least one quickdraw for every bolt on the route, plus any additional equipment required for the anchor. Bolt counts and anchor configurations vary, so check a current guidebook or reliable route description before leaving the ground. Carrying one or two extra quickdraws is also useful.
How do I know whether my rope is long enough?
Check both the route length and the recommended rope length in a current guidebook or route description on Mountain Project. Do not assume that a rope is long enough simply because it worked on another route. Always tie a stopper knot in the belayer’s end of the rope to help prevent the end from passing unexpectedly through the belay device.
Do I need a stick clip?
A stick clip is not required for every sport climb, but it can be a valuable safety tool. It allows you to clip the first bolt from the ground before you begin climbing, reducing the risk of an unprotected ground fall.
Consider using one when the first bolt is high, the opening moves are difficult, the landing is uneven, or a fall before the first clip could have serious consequences. Stick clips can also be useful when the second bolt is unusually far above the first or when you want to rehearse the beginning of a route with the rope already clipped.
Do I need belay glasses?
Belay glasses are optional, but they can make belaying more comfortable by allowing you to watch the climber without constantly tilting your head upward. They are especially useful on long routes, steep walls, or days when you will be belaying a “projecting” climber for a long time.
How do you belay a lead climber?
Lead belaying is an essential sport-climbing skill. It requires managing slack without short-roping the climber, maintaining control of the brake strand, anticipating clips and falls, and positioning yourself appropriately at the base of the route. Learn and practice these techniques under qualified supervision before belaying a leader outdoors. This video demonstrates the AMGA-recommended techniques for lead belaying with a GriGri.
What if my belayer weighs less than me?
Forces generated by lead falls are much higher than top-rope falls. A big whipper can launch a lighter belayer several feet in the air. If there is a large weight difference between you and your belayer, one way to help mitigate this is with the Edelrid Ohm.